JenkinsでxUnitを実行・レポート出力する方法
JenkinsでxUnitを実行したときに少しハマったのでメモメモ。
JenkinsでxUnitを使用している場合、MSTestと同じ方法では実行できません。
xUnitを使用するには、"xunit.runner.console"が必要です。
以下、実行環境です。
- Jenkins : 2.31.2
- .NET Framework : 4.6
- xUnit : 2.1.0
1.xUnitをNuGetパッケージから取得する。
NuGetで以下のパッケージを取得します。
- xunit
- xunit.runner.console
2.JenkinsでxUnit実行ジョブを設定する。
Jenkinsのジョブ設定で、ビルドから"Windowsバッチコマンドの実行"を追加して以下のコマンドを入力します。
::過去の結果があれば削除
rmdir /S /Q <レポート出力フォルダ>
mkdir <レポート出力フォルダ>
::xUnitは通常のMSTestではなく、以下の方法で実行する必要がある。
cd %WORKSPACE%\packages\xunit.runner.console.2.1.0\tools
xunit.console.exe "%WORKSPACE%<ユニットテストプロジェクトDLLパス>" -nunit "%WORKSPACE%<レポート出力フォルダ>\<レポートファイル名>.xml"
"xunit.console.exe"はxUnitをコンソールで実行するための実行ファイルです。
ちなみに、"-?"で以下のようなヘルプが表示されます。
Valid options:
  -nologo                : do not show the copyright message
  -nocolor               : do not output results with colors
  -noappdomain           : do not use app domains to run test code
  -failskips             : convert skipped tests into failures
  -parallel option       : set parallelization based on option
                         :   none        - turn off all parallelization
                         :   collections - only parallelize collections
                         :   assemblies  - only parallelize assemblies
                         :   all         - parallelize assemblies & collections
  -maxthreads count      : maximum thread count for collection parallelization
                         :   default   - run with default (1 thread per CPU thread)
                         :   unlimited - run with unbounded thread count
                         :   (number)  - limit task thread pool size to 'count'
  -noshadow              : do not shadow copy assemblies
  -wait                  : wait for input after completion
  -diagnostics           : enable diagnostics messages for all test assemblies
  -debug                 : launch the debugger to debug the tests
  -serialize             : serialize all test cases (for diagnostic purposes only)
  -trait "name=value"    : only run tests with matching name/value traits
                         : if specified more than once, acts as an OR operation
  -notrait "name=value"  : do not run tests with matching name/value traits
                         : if specified more than once, acts as an AND operation
  -method "name"         : run a given test method (should be fully specified;
                         : i.e., 'MyNamespace.MyClass.MyTestMethod')
                         : if specified more than once, acts as an OR operation
  -class "name"          : run all methods in a given test class (should be fully
                         : specified; i.e., 'MyNamespace.MyClass')
                         : if specified more than once, acts as an OR operation
  -namespace "name"      : run all methods in a given namespace (i.e.,
                         : 'MyNamespace.MySubNamespace')
                         : if specified more than once, acts as an OR operation

Reporters: (optional, choose only one)
  -appveyor              : forces AppVeyor CI mode (normally auto-detected)
  -quiet                 : do not show progress messages
  -teamcity              : forces TeamCity mode (normally auto-detected)
  -verbose               : show verbose progress messages

Result formats: (optional, choose one or more)
  -xml <filename>        : output results to xUnit.net v2 style XML file
  -xmlv1 <filename>      : output results to xUnit.net v1 style XML file
  -nunit <filename>      : output results to NUnit-style XML file
  -html <filename>       : output results to HTML file
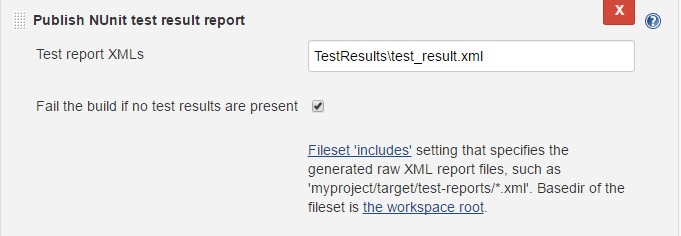
Jenkinsには、xUnitでのレポート出力フォーマットに対応していないので、NUnitのフォーマットで出力します。
Publish HTML reportプラグインでレポートを確認したい場合は、HTML出力も追加してもいいかもしれません。
Jenkinsでインストーラーを作成する方法
Visual Studio 2012以降、昔ながらのインストーラセットアップ プロジェクトが拡張機能で使用することができます。
(Visual Studio 2010は、Install Shield一択だったのですがあれは何だったのか…)
できればこのあたりもJenkinsで実行できれば、
ということができます。
まずは下準備としてJenkinsを起動しているPCのVisual Studioの拡張機能からインストーラーを追加します。
[ツール] - [拡張機能と更新プログラム]を選択し、オンラインから"install"で検索してインストーラープロジェクトを追加します。

次にレジストリエディタを開いて以下の値を追加します。

"12.0_Config"と言うのは"Visual Studio 2013"の構成情報のことです。
2012の場合は、"11.0_Config"、2015の場合は、"14.0_Config"となっています。
ちなみに、これを追加しないとビルドしても以下のようなメッセージが出力されてインストーラーが作成されません。
(これに結構ハマってました…)
ERROR: An error occurred while validating. HRESULT = '8000000A'
続いてJenkinsの設定です。
ジョブの設定から、"Windowsバッチコマンドの実行"を選択して以下のコマンドを入力します。
:: 開発環境によって実行フォルダを変えてください。
cd C:\Program Files (x86)\Microsoft Visual Studio 14.0\Common7\IDE
devenv "%WORKSPACE%<ソリューションファイルパス>" /Project "%WORKSPACE%<セットアッププロジェクトパス>" /Build "Release"
上記では"Release"モードでビルドしていますが、ここは必要に応じて変更してください。
なお、"devenv.exe"のコマンドライン引数は以下を参照してください。
Jenkinsで独自NuGetパッケージの復元メモ
以前、Jenkinsを使用してNuGetパッケージを復元することができました。
iyemon018.hatenablog.com
今回は独自に作成したNuGetパッケージの復元を行います。
例えば社内で管理しているライブラリの復元も行うことができます。
まずは下準備
1. Jenkins実行ユーザーの"%AppData%\NuGet"フォルダから"NuGet.Config"を参照します。
2. ファイルを開き以下のように変更します。※1.
<?xml version="1.0" encoding="utf-8"?>
<configuration>
  <packageRestore>
    <add key="enabled" value="True" />
    <add key="automatic" value="True" />
  </packageRestore>
  <packageSources>
    <add key="nuget.org" value="https://www.nuget.org/api/v2/" />
    <add key="<独自NuGet>" value="<独自NuGetパッケージ保存パス>" />
  </packageSources>
  <disabledPackageSources />
  <activePackageSource>
    <add key="All" value="(Aggregate source)" />
  </activePackageSource>
  <bindingRedirects>
    <add key="skip" value="False" />
  </bindingRedirects>
</configuration>
3. Jenkinsのジョブで"Windowsバッチコマンドの実行"を選択し、以下のコマンドを入力します。
cd "C:\Nuget"
nuget.exe restore %WORKSPACE%\<ソリューション ファイル パス>
※1. 以下の方法でもOKです。
1. NuGet.configを別名で保存し、任意のフォルダにコピーします。(内容は上記2.のものを保存します。)
2. Jenkinsのジョブで"Windowsバッチコマンドの実行"を選択肢、以下のコマンドを入力します。
cd "C:\Nuget"
nuget.exe restore %WORKSPACE%\<ソリューション ファイル パス> -configfile "<NuGet.configファイルパス>"
(NuGet.exeのコマンドライン引数については以下を参照)
NuGet Command-Line Interface (CLI) Reference | Microsoft Docs
独自NuGetパッケージが共有フォルダに配置されている場合は、アクセス権を持つユーザーで実行する必要があります。
Jenkinsの実行ユーザーを変更するには以下を参照してください。
iyemon018.hatenablog.com
Windows上のJenkinsを特定のユーザーで実行する
Windows上でJenkinsを起動しているときに実行しているユーザーを切り替える必要があったのでメモ。
環境は以下の通り。
- OS : Windows Server 2012 R2
- Jenkins : Ver.2.32.1
JenkinsはWindows上ではサービスで起動していて、各ジョブはOSのシステムが実行しています。
試しにジョブで"Windowsバッチコマンドの実行"で以下のコマンドを入力します。
whoami /user
するとコンソール出力にこのようなログが出力されます。
ユーザー名          SID
=================== ========
nt authority\system <SID>
これが現在Jenkinsを実行しているユーザーです。
このユーザーを切り替えるには、以下の手順を実行します。
- [コントロールパネル] - [管理ツール] - [サービス] を開く。
- 一覧から[Jenkins]を探し、右クリック[プロパティ]を選択する。
- [ログオン]タブから[アカウント]を選択し、ユーザーとパスワードを入力する。
- [OK]をクリックしてサービスを再起動する。
これで指定したユーザーで実行することができます。
JenkinsでNuGetパッケージの復元メモ
Jenkinsを使用してプロジェクトをビルドするとNuGetパッケージの復元が実行されなかったので、その解決方法をメモメモ
環境は以下の通り
- Jenkins:Ver.2.32.1
- Visual Studio:2015 Enterprise
- Team Foundation Server:2012 SP4
Visual Studio 2015からはNuGet.exeがプロジェクトに配置されなくなり、ビルド時に自動的に復元されるようになったためJenkins側で復元してやる必要があります。
1.NuGet.exeをダウンロードする。
以下のページからNuGet.exeをダウンロードして任意の場所に保存します。
Installing NuGet | Microsoft Docs
2.Windowsバッチコマンドを実行する。
ジョブのビルドから[Windowsバッチコマンドの実行]を選択して以下のコマンドを設定します。
cd "<NuGet.exeの配置パス>"
nuget.exe restore "%WORKSPACE%<復元対象のソリューション ファイルパス>"
Visual Studio 2013以前は、プロジェクトに配置されているNuGet.exeを参照すればOKです。
これでジョブを実行すればパッケージの復元ができます。
復元のためのバッチコマンド実行は、必ずMSBuildの実行よりも前に設定してください。
また、NuGet.exeのオプションなどは以下を参照してください。
NuGet Command-Line Interface (CLI) Reference | Microsoft Docs

