やる気駆動型エンジニアの備忘録

WPF(XAML+C#)の話題を中心に.NET/Android/CI やたまに趣味に関するブログです

Windows Forms のChart を使う~SeriesChartType:グラフ系列種別~

最近Windows FormsのChartを使用する機会があったので、備忘録として使い方を残します。

まず今回はChartにどんな種類のグラフが使用できるのか見ていきます。
Chartの系列は"Series"プロパティでアクセスすることができます。
この系列の種類を変えるには、ChartType プロパティを変更すればOKです。
ChartTypeプロパティは、列挙体のSeriesChartType 型ですが、これは以下の種別が定義されています。
なので、ここに定義されているグラフの種類=Chartで表現できる種類 ということです。

続きを読む

Visual Studio 2017を使ってみた

いよいよリリースされたVisual Studio 2017
さっそくPCにインストールしてみました。

まぁ、ぶっちゃけどんな機能が追加されたのかは以下のページを参照したほうが手っ取り早いです。

www.atmarkit.co.jp
www.visualstudio.com

リリースノートは以下から。
www.visualstudio.com

最初インストールしたときには気が付かなかったんですが、"Live Unit Testing"の機能はEnterpriseにしかないそうで。
Communityエディションにはありませんので注意。

もう一つ気になったのですが…
f:id:iyemon018:20170309215654j:plain
"XML をクラスとして貼り付ける"のメニュー無くね?
あれか、XMLはもはや時代遅れということか…

もはや定番拡張機能となったProductivity Power Toolsの2017向けツールもリリースされています。
blogs.msdn.microsoft.com

Team Foundation Server 2017

また、TFSも次期バージョンがリリースされています。
www.visualstudio.com

WPFでCarouselPanelを作る

前回、PathListBoxを使って遊んでみましたが、今回もPathListBoxを使ってみます。
iyemon018.hatenablog.com

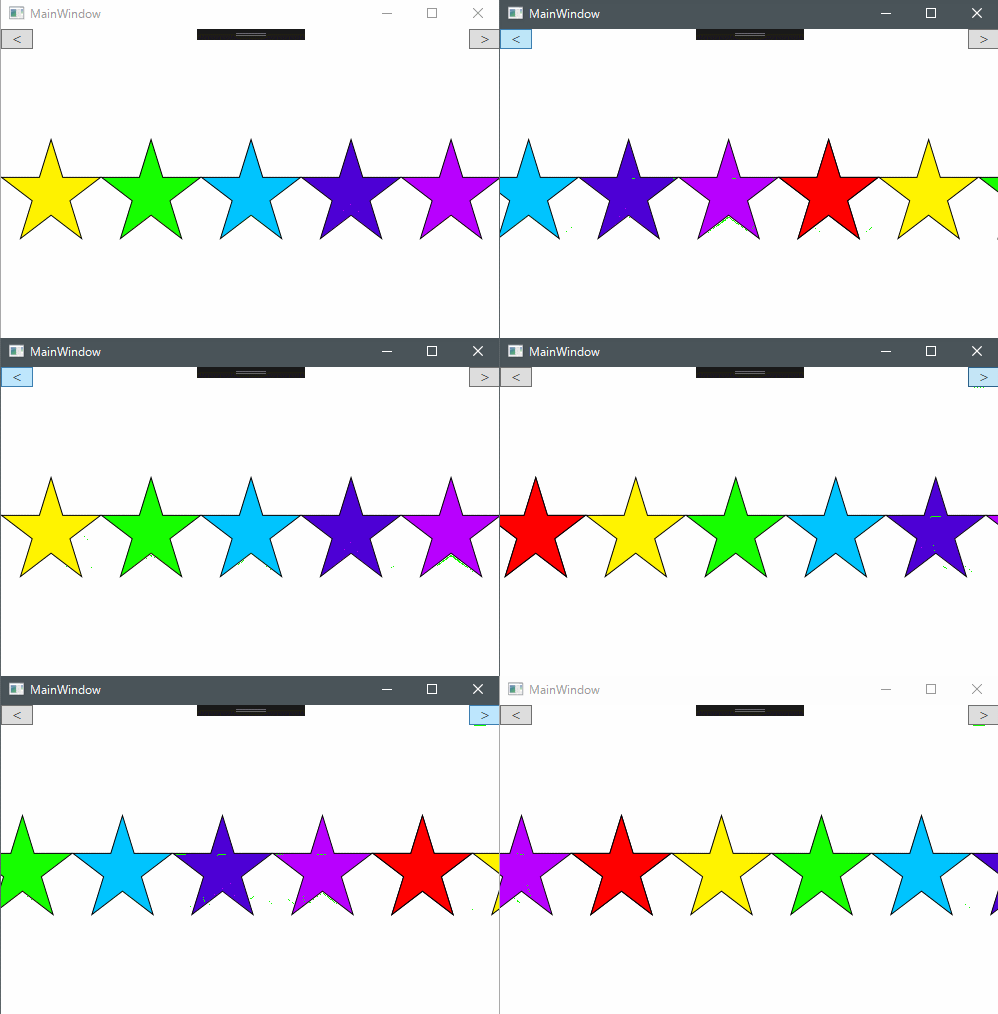
ルーセルパネル(Carousel Panel)は、左右にコンテンツをスライドするあれです。
まずはサンプルプログラムの動作を見てみます。

f:id:iyemon018:20170216154556g:plain

このように複数のコンテンツを無限にスライドし続けることができます。
以下、サンプルソースです。
必要なアセンブリ名前空間は、前回の記事を参照してください。

続きを読む

WPFでPathListBoxを使う

WPFのコントロールにPathListBoxというものがあります。
これは、通常のItemsControlとは少し異なる動作をします。
百聞は一見にしかず、まずは以下のイメージを御覧ください。

f:id:iyemon018:20170212225314g:plain

単純な動作ではありますが他のList系コントロールとは明らかに動作が異なります。
このような一風変わったPathListBoxですが、かなり簡単に実装することができます。

PathListBoxのプロパティ

PathListBoxには以下のプロパティがあります。

  • StartItemIndex
  • WrapItems
  • LayoutPaths

StartItemIndex

ItemsSourceに設定したコレクション要素の開始インデックスのプロパティです。
例えば"StartItemIndex=2"に設定すると以下の様になります。

f:id:iyemon018:20170212231943p:plain

WrapItems

このプロパティをtrueにすると、表示範囲外にあるコレクション要素をラップします。
falseにすると、表示範囲外のコレクション要素はラップされずに見切れてしまいます。

f:id:iyemon018:20170215152657j:plain

LayoutPaths

ItemsSourceにバインドしたコレクションを配置するためのレイアウト要素を設定することができます。
上記のサンプルでは、赤いPathを作成し、そのPathをLayoutPathsに設定しています。

以下、サンプルのソースです。

事前準備

PathListBoxを使用するには、以下のアセンブリを参照する必要があります。
Blendを使用すればドラッグアンドドロップで自動的に参照が追加されます。

PathListBoxを参照するには、予め以下の名前空間を追加しておきましょう。

xmlns:ec="http://schemas.microsoft.com/expression/2010/controls"
<Window x:Class="PathListBoxSample.MainWindow"
        xmlns="http://schemas.microsoft.com/winfx/2006/xaml/presentation"
        xmlns:x="http://schemas.microsoft.com/winfx/2006/xaml"
        xmlns:d="http://schemas.microsoft.com/expression/blend/2008"
        xmlns:ec="http://schemas.microsoft.com/expression/2010/controls"
        xmlns:local="clr-namespace:PathListBoxSample"
        xmlns:mc="http://schemas.openxmlformats.org/markup-compatibility/2006"
        Title="MainWindow"
        Width="240"
        Height="240"
        mc:Ignorable="d">
    <Window.DataContext>
        <local:MainViewModel />
    </Window.DataContext>
    <Grid>
        <ec:PathListBox ItemsSource="{Binding Values,
                                              Mode=OneWay}"
                        StartItemIndex="2"
                        WrapItems="True">
            <ec:PathListBox.LayoutPaths>
                <ec:LayoutPath SourceElement="{Binding ElementName=path}" />
            </ec:PathListBox.LayoutPaths>
        </ec:PathListBox>
        <Border>
            <Path x:Name="path"
                  Margin="47.958,56.296,51.484,48.649"
                  Data="M167.9651,297.05052 C167.1821,300.96551 298.95333,358.22029 298.95333,358.22029 L336.53545,481.93313 501.22995,268.87785 584.51969,339.3325"
                  Stretch="Fill"
                  Stroke="#FFE40000" />
        </Border>
        <Button Width="32"
                HorizontalAlignment="Left"
                VerticalAlignment="Top"
                Command="{Binding AddCommand,
                                  Mode=OneWay}"
                Content="+" />
        <Button Width="32"
                Margin="36,0,0,0"
                HorizontalAlignment="Left"
                VerticalAlignment="Top"
                Command="{Binding SubCommand,
                                  Mode=OneWay}"
                Content="-" />
    </Grid>
</Window>
  • MainViewModel.cs
namespace PathListBoxSample
{
    using System.Collections.ObjectModel;
    using System.Linq;
    using Microsoft.Practices.Prism.Commands;
    using Microsoft.Practices.Prism.Mvvm;

    public class MainViewModel : BindableBase
    {
        public ObservableCollection<int> Values { get; private set; }

        public DelegateCommand AddCommand { get; private set; }

        public DelegateCommand SubCommand { get; private set; }

        public MainViewModel()
        {
            Values = new ObservableCollection<int>(Enumerable.Range(1, 5));
            AddCommand = new DelegateCommand(() => Values.Add(Values.Max() + 1));
            SubCommand = new DelegateCommand(() =>
                                             {
                                                 if (Values.Any()) Values.Remove(Values.Max());
                                             });
        }
    }
}

このようにPathListBoxはWPFの中でもかなり特殊なコントロールです。
以下のページにもう少し詳しい使い方が記述されています。

パスに沿ったアイテムのレイアウト

今回作成したサンプルはこちら↓↓↓↓↓
github.com

JenkinsでxUnitを実行・レポート出力する方法

JenkinsでxUnitを実行したときに少しハマったのでメモメモ。
JenkinsでxUnitを使用している場合、MSTestと同じ方法では実行できません。
xUnitを使用するには、"xunit.runner.console"が必要です。
以下、実行環境です。

1.xUnitをNuGetパッケージから取得する。

NuGetで以下のパッケージを取得します。

  • xunit
  • xunit.runner.console

2.JenkinsでxUnit実行ジョブを設定する。

Jenkinsのジョブ設定で、ビルドから"Windowsバッチコマンドの実行"を追加して以下のコマンドを入力します。

::過去の結果があれば削除
rmdir /S /Q <レポート出力フォルダ>
mkdir <レポート出力フォルダ>
::xUnitは通常のMSTestではなく、以下の方法で実行する必要がある。
cd %WORKSPACE%\packages\xunit.runner.console.2.1.0\tools
xunit.console.exe "%WORKSPACE%<ユニットテストプロジェクトDLLパス>" -nunit "%WORKSPACE%<レポート出力フォルダ>\<レポートファイル名>.xml"

"xunit.console.exe"はxUnitをコンソールで実行するための実行ファイルです。
ちなみに、"-?"で以下のようなヘルプが表示されます。

Valid options:
  -nologo                : do not show the copyright message
  -nocolor               : do not output results with colors
  -noappdomain           : do not use app domains to run test code
  -failskips             : convert skipped tests into failures
  -parallel option       : set parallelization based on option
                         :   none        - turn off all parallelization
                         :   collections - only parallelize collections
                         :   assemblies  - only parallelize assemblies
                         :   all         - parallelize assemblies & collections
  -maxthreads count      : maximum thread count for collection parallelization
                         :   default   - run with default (1 thread per CPU thread)
                         :   unlimited - run with unbounded thread count
                         :   (number)  - limit task thread pool size to 'count'
  -noshadow              : do not shadow copy assemblies
  -wait                  : wait for input after completion
  -diagnostics           : enable diagnostics messages for all test assemblies
  -debug                 : launch the debugger to debug the tests
  -serialize             : serialize all test cases (for diagnostic purposes only)
  -trait "name=value"    : only run tests with matching name/value traits
                         : if specified more than once, acts as an OR operation
  -notrait "name=value"  : do not run tests with matching name/value traits
                         : if specified more than once, acts as an AND operation
  -method "name"         : run a given test method (should be fully specified;
                         : i.e., 'MyNamespace.MyClass.MyTestMethod')
                         : if specified more than once, acts as an OR operation
  -class "name"          : run all methods in a given test class (should be fully
                         : specified; i.e., 'MyNamespace.MyClass')
                         : if specified more than once, acts as an OR operation
  -namespace "name"      : run all methods in a given namespace (i.e.,
                         : 'MyNamespace.MySubNamespace')
                         : if specified more than once, acts as an OR operation

Reporters: (optional, choose only one)
  -appveyor              : forces AppVeyor CI mode (normally auto-detected)
  -quiet                 : do not show progress messages
  -teamcity              : forces TeamCity mode (normally auto-detected)
  -verbose               : show verbose progress messages

Result formats: (optional, choose one or more)
  -xml <filename>        : output results to xUnit.net v2 style XML file
  -xmlv1 <filename>      : output results to xUnit.net v1 style XML file
  -nunit <filename>      : output results to NUnit-style XML file
  -html <filename>       : output results to HTML file

Jenkinsには、xUnitでのレポート出力フォーマットに対応していないので、NUnitのフォーマットで出力します。
Publish HTML reportプラグインでレポートを確認したい場合は、HTML出力も追加してもいいかもしれません。

3.xUnitのレポート出力を設定する。

ここでは、予め"NUnit plugin"をインストールしておいてください。
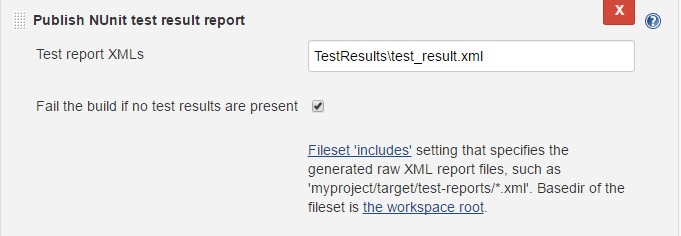
ビルド後の処理から"Publish NUnit test result report"を選択し、以下の内容を設定します。
f:id:iyemon018:20170202170257j:plain

"Test report XMLs"には、出力したレポートファイルのパスを設定します。

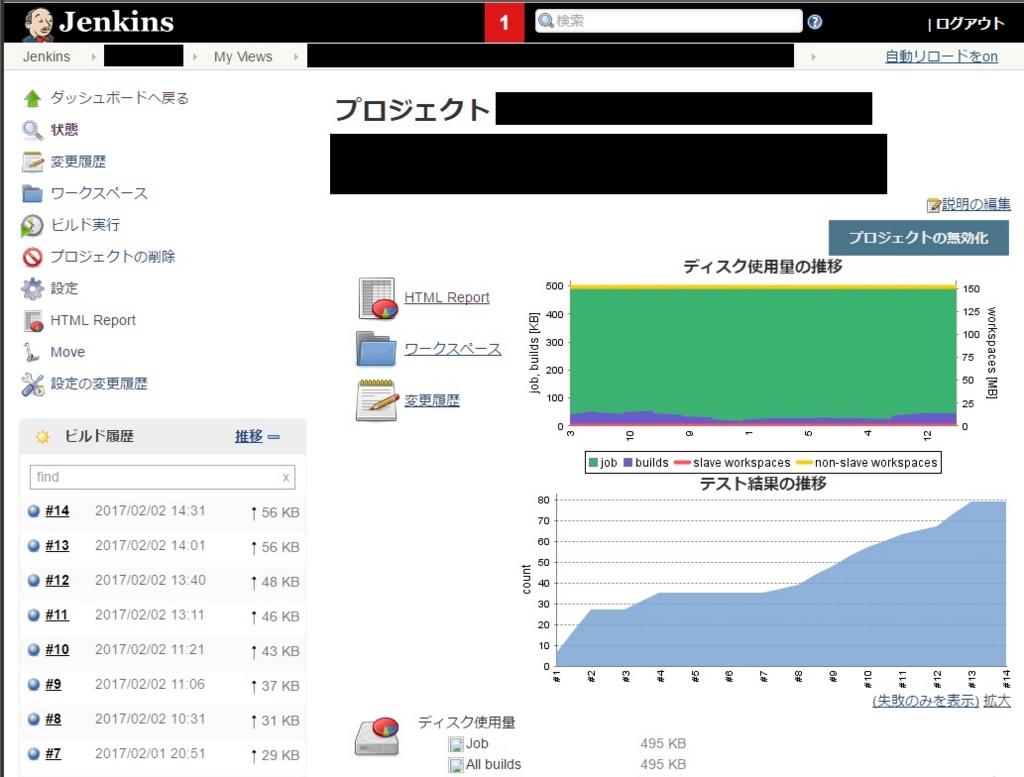
あとはジョブを実行するとテスト結果が出力されるようになります。
f:id:iyemon018:20170202170720j:plain

カバレッジをレポートで出力する場合はこちらを参照してください。
iyemon018.hatenablog.com


めでたし、めでたし