WPFのCalendarコントロールをカスタマイズ
WPFのCalendarコントロールは日付を選択する場合に便利ですが、標準ではサポートされていない機能があります。
例えば土、日、祝日の場合に文字色を変更するなど。
日本国内限定の使用とはいえ、地味に欲しい機能ではあります。
ただ、Calendarコントロールは便利な半面、sealed されているため機能を拡張することはできません。
かと言って1からカスタムCalendarコントロールを作るのも面倒です。
今回はWPFのメリットを活かして、コンバーターとスタイルを使って土日のボタンを色替えをします。
ちなみにデフォルトではこのようになっています。

1. カレンダーコントロールの構成
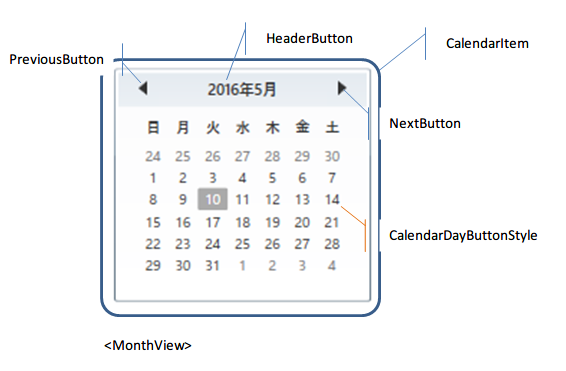
CalendarのControlTemplateはいくつかのパーツによって構成されています。
CalendarControlを構成するパーツについては以下を参照してください。
各パーツは以下の様に配置、使用されています。


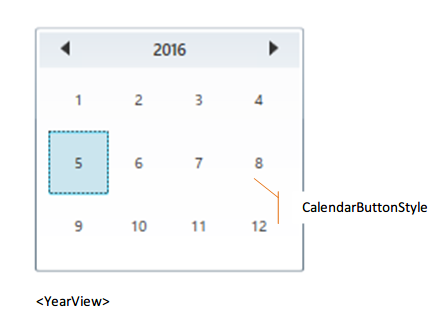
Calendarには年月を指定したMonthViewと月を指定する、もしくは表示する年数を指定するYearViewが存在します。
上記の図にもあるように、MonthViewで表示されている日付ボタンには"CalendarDayButtonStyle"が使用され、YearViewで表示されているボタンには"CalendarButtonStyle"が使用されています。
今回はこの"CalendarDayButtonStyle"にコンバーターを設定していきます。
2. CalendarDayButtonStyleの構造
CalendarDayButtonStyleもCalendarItem同様、少々複雑な構造になっています。

このように7つのレイヤーに分かれており、それぞれ以下の特性を持ちます。
①DayButtonFocusVisual
フォーカスを取得した時に表示するRectangle
表示の切り替えはViewStateManagerで行う。
②Blackout
選択不可能な日付であることを表す✕マークを表示する。
CalendarのBlockoutDatesに設定した日付はこのマークを表示する。
③NormalText
日付の日数分を表示する。
このボタンコントロールのContentPresenter。
④HighlightBackground
MouseOver,Pressed,Disable状態に表示するRectangle
⑤(Border)
ボタンの枠線
⑥SelectedBackground
選択された場合に表示するRectangle
⑦TodayBackground
DataContextの日付がDateTime.Todayの場合に表示する背景Rectangle
そして、CalendarDayButtonStyleのTemplateには、DataContextにCalendarのDateTimeがバインドされています。
3. コンバーターの実装
コンバーターはバインドしたDateTimeのDayOfWeekの値によってブラシリソースを切り替えます。
namespace CalendarSample1
{
    using System;
    using System.Globalization;
    using System.Windows;
    using System.Windows.Data;
    using System.Windows.Media;

    /// <summary>
    /// <see cref="T:DateTime"/>の値から曜日の<see cref="T:Brush"/>リソースへのコンバータークラスです。
    /// </summary>
    /// <seealso cref="System.Windows.Data.IValueConverter" />
    [ValueConversion(typeof(DateTime), typeof(Brush))]
    public class DateTimeToDayOfWeekBrushConverter : IValueConverter
    {
        /// <summary>
        /// 日曜日用のブラシリソース
        /// </summary>
        public static Brush SundayBrush
        {
            get { return Brushes.Red; }
        }

        /// <summary>
        /// 土曜日用のブラシリソース
        /// </summary>
        public static Brush SaturdayBrush
        {
            get { return Brushes.Blue; }
        }

        /// <summary>値を変換します。</summary>
        /// <returns>変換された値。 メソッドが null を返す場合は、有効な null 値が使用されています。</returns>
        /// <param name="value">バインディング ソースによって生成された値。</param>
        /// <param name="targetType">バインディング ターゲット プロパティの型。</param>
        /// <param name="parameter">使用するコンバーター パラメーター。</param>
        /// <param name="culture">コンバーターで使用するカルチャ。</param>
        public object Convert(object value, Type targetType, object parameter, CultureInfo culture)
        {
            if (!(value is DateTime))
            {
                return DependencyProperty.UnsetValue;
            }

            var dayOfWeek = ((DateTime)value).DayOfWeek;
            switch (dayOfWeek)
            {
                case DayOfWeek.Sunday:
                    return SundayBrush;
                case DayOfWeek.Saturday:
                    return SaturdayBrush;
                default:
                    return DependencyProperty.UnsetValue;
            }
        }

        /// <summary>値を変換します。</summary>
        /// <returns>変換された値。 メソッドが null を返す場合は、有効な null 値が使用されています。</returns>
        /// <param name="value">バインディング ターゲットによって生成される値。</param>
        /// <param name="targetType">変換後の型。</param>
        /// <param name="parameter">使用するコンバーター パラメーター。</param>
        /// <param name="culture">コンバーターで使用するカルチャ。</param>
        public object ConvertBack(object value, Type targetType, object parameter, CultureInfo culture)
        {
            throw new NotImplementedException();
        }
    }
}
これをリソースディクショナリに追加します。
<local:DateTimeToDayOfWeekBrushConverter x:Key="DateTimeToDayOfWeekBrushConverter" />
あとは、CalendarDayButtonStyleに以下のように設定します。
    <Style x:Key="DefaultCalendarDayButtonStyle" TargetType="{x:Type CalendarDayButton}">
        <Setter Property="Foreground" Value="{Binding Converter={StaticResource DateTimeToDayOfWeekBrushConverter}, Mode=OneWay}" />
        <!--  省略  -->
        <Setter Property="Template">
                    <!--  省略  -->
                        <!--  TextElement.Foreground で直接文字色を設定しているのでコメントアウト or 削除します。  -->
                        <ContentPresenter x:Name="NormalText"
                                          Margin="5,1,5,1"
                                          HorizontalAlignment="{TemplateBinding HorizontalContentAlignment}"
                                          VerticalAlignment="{TemplateBinding VerticalContentAlignment}"/>
                                          <!--TextElement.Foreground="#FF333333" />-->
                    <!--  省略  -->
                </ControlTemplate>
            </Setter.Value>
        </Setter>
    </Style>
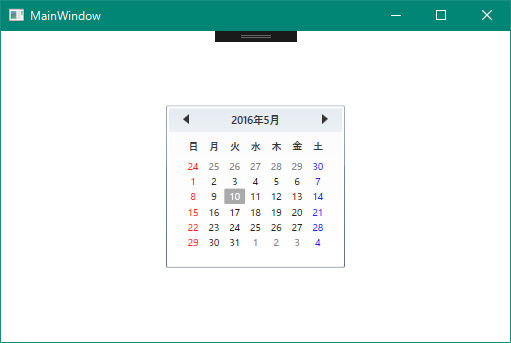
これで実行するとこのようになります。

日付ボタンを色替えすることはできましたが、曜日ヘッダー部分が変わっていません。
ついでにこれも色替えしましょう。
曜日ヘッダー部分の文字列はCalendarItem.DayTitleTemplateResourceKeyのDataTemplateによってCalendarItemに定義されています。
表示している曜日の文言はOSの言語設定に依存していて、日本語の場合、"日"~"土"までを表示します。
これに以下のように手を加える事で曜日の文字色も色替えすることが可能です。
    <Style x:Key="DefaultCalendarItemStyle" TargetType="{x:Type CalendarItem}">
        <Setter Property="Margin" Value="0,3,0,3" />
        <Setter Property="Template">
            <Setter.Value>
                <ControlTemplate TargetType="{x:Type CalendarItem}">
                    <ControlTemplate.Resources>
                        <DataTemplate x:Key="{x:Static CalendarItem.DayTitleTemplateResourceKey}">
                            <!--  ForegroundはStyleへ移動させる。  -->
                            <TextBlock Margin="0,6,0,6"
                                       HorizontalAlignment="Center"
                                       VerticalAlignment="Center"
                                       FontFamily="Verdana"
                                       FontSize="9.5"
                                       FontWeight="Bold"
                                       Text="{Binding}">
                                <TextBlock.Style>
                                    <Style TargetType="{x:Type TextBlock}">
                                        <Setter Property="Foreground" Value="#FF333333" />
                                        <Style.Triggers>
                                            <!--  バインドされている値によって文字色を切り替える。  -->
                                            <DataTrigger Binding="{Binding }" Value="日">
                                                <Setter Property="Foreground" Value="{Binding Source={StaticResource DateTimeToDayOfWeekBrushConverter}, Path=SundayBrush, Mode=OneWay}" />
                                            </DataTrigger>
                                            <DataTrigger Binding="{Binding }" Value="土">
                                                <Setter Property="Foreground" Value="{Binding Source={StaticResource DateTimeToDayOfWeekBrushConverter}, Path=SaturdayBrush, Mode=OneWay}" />
                                            </DataTrigger>
                                        </Style.Triggers>
                                    </Style>
                                </TextBlock.Style>
                            </TextBlock>
                        </DataTemplate>
                    </ControlTemplate.Resources>
                    <Grid x:Name="PART_Root">
                   <!--  省略  -->
                </ControlTemplate>
            </Setter.Value>
        </Setter>
    </Style>
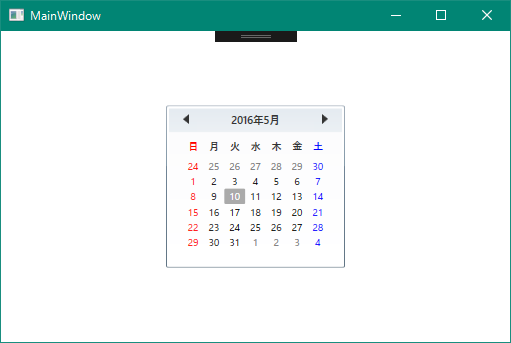
これを実行すると以下のようになります。

曜日も日付ボタンも色替えができましたね。
このようにCalendarのスタイルをカスタマイズするだけで簡単にボタンの色替えなどが実現できます。
今回使用したソースはこちら↓↓↓
github.com